Purple Pitchfork
  • Home
  • Podcast
  • About Chris
  • Farming Resources from Chris
  • Donate

Forget about the Vegetables

10/8/2015

2 Comments

 
If I grow good soil, I can forget about the vegetables. - Nigel Walker

Over the course of the past nine months, I’ve interviewed over thirty farmers on the Farmer to Farmer Podcast, spent a day each on ten different beginning farms, and worked with several experienced growers in different capacities. And here’s what I’ve learned:

​It’s not about the vegetables.

Of course, you have to know how to produce the vegetables. Or the chickens, or the cows, or the herbs, or whatever. You can’t get away from needing to know the basics.

And you have to do the work to grow the vegetables.

But one common theme among successful operators has really surfaced: when you put the rest of your world in order, the vegetables (or the chickens) just sort of get in line.

At Angelic Organics, John Peterson builds the soil for two years, uses an easy-to-weed crop to clean the soil, then grows carrots or salad greens that usually don’t require much attention to weeding.

At La Grelinette, J.M. Fortier has used created permanent beds and permanent pathways to reduce compaction, minimizing tillage requirements and driving up yields.

At Tipi Produce, Steve Pincus and Beth Kazmar put employees first, and have almost eliminated turnover in their crew. They don’t spend hours in May teaching employees how to work on a vegetable farm.

At Pleasant Valley Farm, Paul and Sandy Arnold have invested in smart infrastructure that creates high returns and drives costs and inputs down year after year, without taking on a mountain of debt. The farm gets smaller and more profitable every year.

At Spring Hill Community Farm, Patty Wright and Mike Racette have organized their CSA around creating community with their customers, creating a retention rate that approaches one hundred percent (and drives their marketing budget to down near zero).

At Eatwell Farm, Nigel Walker runs his chickens on the cover crops for a year, and gets two full years of practically pest-free vegetable production from the fertility and biological cycling he has created.

At TLC Ranch, Rebecca Thistlethwaite rigorously analyzed the time spent on chores to focus on the most profitable activities.

At Clay Bottom Farm, Ben Hartman cleaned up his work spaces to facilitate the smooth flow of workers and work.

At your farm, what can you do to set yourself up for success?

2 Comments

Farming Ahead

9/24/2015

2 Comments

 
A lot of the farms I’ve worked with recently who are really crushing it put a lot of time and effort into “farming ahead.”

All farming requires farming ahead to some degree or another: the act of planting a seed in anticipation of a harvest weeks or months later involves looking out months in advance and taking action now based on what you want to be true in the future.

But the farmers I’m talking about are farming ahead in much larger ways:

  • Rotating fields out of vegetable production for one year for every year they are growing vegetables (sometimes two years in a row), planting and managing cover crops to build soil and control weeds.

  • Cleaning spaces until they shine so that those spaces only take minimal maintenance during the production season.

  • Maintaining equipment in the winter so that when spring comes around, they just grease a few Zerks and they’re ready to go.

  • Building the biological and nutrient cycling in their soils to levels that don’t require amendment for multiple subsequent crops of vegetables.

  • Thinking through systems ahead of time so that they have the checklists and procedures clearly laid out before an employee steps on the farm, so that they don’t have to think about what to tell people and how to tell them.

  • Thoroughly planning planting and tillage schedules and maps so that in the rush of summer, they simply execute.

  • Making conscious decisions about scale and  income goals, rather than always scrambling for more.

What can you do now to get ahead for next year? What can you stage now to work on this winter?

2 Comments

Picking the Perfect Winter Squash

9/17/2015

3 Comments

 
The vast majority of winter squash out there is insipid and boring. Every now and then, the average consumer will pick a winner by blind luck, and they’ll be thrilled. But for every sweet and delicious squash they find, they get several duds.

The flavor, nutritional value, and keeping qualities of winter squash depend absolutely on the maturity of the fruit at harvest – and that’s not always easy to determine.

At farmer’s market, customers often asked me how to pick a good winter squash, to which I would invariably reply, “At my stand, you can pick any squash and we guarantee it will be sweet. But let me show you how to find a ripe squash in case you want to buy one from somebody else.” We were able to consistently charge up to three times the going rate for winter squash at farmers market by guaranteeing the eating quality of every squash we sold; at wholesale, we were able to push a 20% premium when we applied this to certain specialty varieties – acorn squash, not so much.

Eating quality in squash has two main components: sweetness and texture. Texture is largely controlled by genetics, although high storage temperatures can cause the flesh to become stringy. And while the sugar content has a large genetic component –think sweet corn – it continues to increase as the squash fruits mature. Nutritional content, especially carotenoid levels, also continues to increase while the squash is on the vine.

That’s why you want to leave the squash on the vine until they are fully ripe. Of course, sugar content and nutrition only increase when there is adequate photosynthesis, so disease and insect control to avoid defoliation is a critical component of getting a good squash harvest, even though you may get an acceptable overall yield without full leaf cover.

Good leaf cover also provides protection from a first, light frost. If you can get your squash patch through the first frost and into the Indian summer that often follows, it is possible to gain a couple of weeks of maturation time for your crop. But, in general, plan to get your crop out of the field before the first hard freeze.

Squash pick up a lot of sweetness during the cool nights of autumn. As they grow, most of the sugars plants produce through photosynthesis are combined and stored in the plant as starches and other large polymers. But in response to cold temperatures, so plants – including squash – break down some of this stored energy into “free” sugars such as glucose and fructose, stashing the sweet stuff in their cells to protect against frost damage. Bonus for squash eaters: that free sugar also makes the plants taste sweeter.

As an additional advantage, fully ripe squash store much better than even their slightly under-ripe counterparts.


Harvest Cues

Squash commonly grown in the northern part of the continent come from three species, all in the genus Cucurbita: C. pepo, C. maxima, and C. moschata. Each has its own cues for ripeness.

Because each plant ripens several fruits in succession, starting with the fruit closest to the central stem, entire fields of squash are never ripe at the same time. Harvesting consistently great squash means you have to leave some in the field.

Although many sources say that you should test all squash for ripeness by trying to pierce the skin with a fingernail, this is simply unacceptable in a commercial setting – how many customers want to buy a damaged squash?

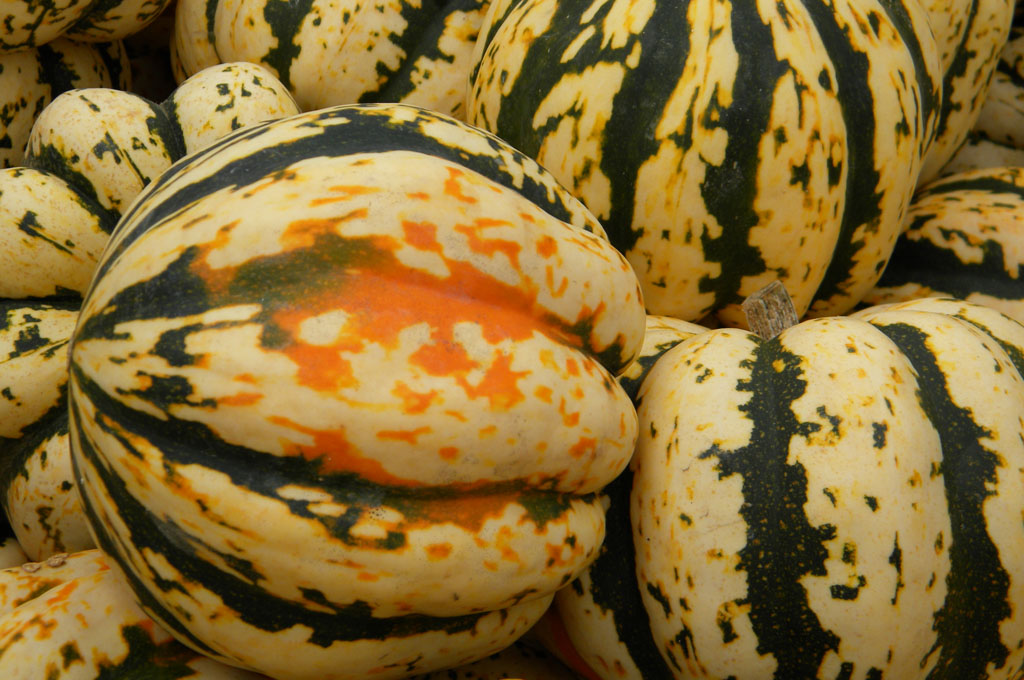
Cucurbita pepos include the Acorn and Delicata types, as well as pumpkins. All pepos have a hard, angular stem with five sides (the “stem” on a fruit is technically called a peduncle, which is much more fun to say than “stem,” but not universally understood), and tend to produce smaller fruits than other species. Where they touch the ground – or anywhere that light is excluded from the skin – C. pepo fruits develop an orange spot that darkens as the fruit ripens. This spot may be large or small, depending on the fruit’s position, but regardless of the size of the spot it is the color that indicates ripeness – when the color of the spot looks as though the cinnamon has been stirred into the pumpkin pie filling, the squash are ready to harvest.

As an initial cue on pale Delicata-types, we also taught our crew to look for a dark green stem and a mellowing of the fruit color from yellow to an earthier shade before turning the squash over to check for the spot.

Cucurbita maximas, including Buttercups, Kabochas, and Hubbards, are characterized by their large, spongy stem that turns corky as it ripens. As the name indicates, these also tend to be the larger fruited varieties (in fact, the world-record “pumpkins” are actually maximas bred to resemble the traditional jack-o-lantern style squash). The first of the maximas tend to ripen after the first of the pepos. To judge ripeness, look at the amount of the stem that has turned corky – you want to see at least 75% of the stem take on a corky texture before harvest. A larger percentage of corky stem is also acceptable.

C. moschatas, such as the Butternuts and Cheese types, have rambling vines and a hard, angular stem that flares out noticeably where it meets the fruit. Most of these ripen from a greenish-hued fruit to more of a peanut color. The greenness also fades from the stem when the fruits are ripe.

At the outset of each squash season, I liked to walk through the field with the harvest crew sampling raw slices of the various varieties while looking at the harvest cues. It’s easy to taste the difference between marginally ripe fruits and the fruits that will make a customer sit up and take notice.

It’s worth noting that squash plants set flowers starting at the central stem, and continuing out along the vines. Fruits will ripen in this order, as well. If you find a ripe fruit, every fruit closer to the center of the plant is also likely to be ripe.

How to Harvest


To harvest, I like to cut the stem right where it joins the vine. Because we hand-packed our squash into crates and bins, we didn’t have to worry about squash bumping into each other and making gouges with the longer stems. If you’re using a harvest conveyor, you might want to cut the stems shorter, especially for the pepos and moschatas.

It’s important to make the cut square to the stem. For the hard-stemmed varieties, I like a sharp bypass pruners to make the cut. In my experience, long-handled loppers encouraged a stooped posture and were difficult to control precisely, whereas pruners provided a precise cut and encouraged more ergonomic squatting.

Curing is always a source of debate among squash enthusiasts. We settled on not curing our pepos, but going ahead and curing our maximas and moschatas. It certainly does no harm.

Curing is best done at 70 to 80 degrees F in a dry place – conditions that are not uncommon after the first frost in New England and the Upper Midwest. Squash can also be cured in boxes, as long as you ensure adequate air circulation.

Picture

3 Comments

A Day in the Fall Is A Week in the Spring

8/27/2015

1 Comment

 
Here we are in the middle of August, and Wisconsin is experiencing a bit of a cold snap. It’s a reminder that the changing of the seasons is, as always, under way.

As we move into the fall, day length begins to shorten at the same time the high temperatures give out. As a result, plant growth begins to decelerate, and that deceleration has a cumulative effect.

Along the 43rd latitude, where I have spent most of my life, there were 890 hours of sunlight between April 15 and June 15; there are 728 hours of sunlight between now and October 28, which is about the time we’d like to be out of the field around here, and pretty much when it’s too cold for things to grow outside.

As a farmer-friend told me long ago, a day’s difference in planting in the fall is like a week’s difference in planting in the spring.

While timelines matter at all times on the farm, it becomes doubly important with fall plantings. Spinach seeded on August 15 will size up for a November harvest, while spinach seeded September 1 probably won’t.

Cover crop effectiveness is especially enhanced with early plantings. Barley and peas seeded now will put on substantial growth before winter-killing, building carbon and protecting the soil. Two weeks from now, that cover crop will still make a difference for holding soil, but won’t put much back into the soil.

Solar Calculator

If you like this sort of thing (I do), you can download a rather comprehensive daylength calculator from NOAA.  It includes just about everything you would want to know about the sun’s location relative to your location. Pretty fun and geeky.

1 Comment

Drought Lessons

5/28/2015

0 Comments

 
For many of my friends in the northeastern United States, the spring of 2015 is starting off with a nasty dry spell.

Even in a non-drought year, water often goes lacking on vegetable farms because of a lack of infrastructure, poor practices, insufficient monitoring, and a simple failure to get out there and put the water on that your crops need.

In 2012, during the extreme drought that we experienced in the Midwest, I had the opportunity to work with and visit several farms, as well as to drag my own farm through the dust. It was a great year to learn about what to do, and what not to do, when it comes to managing irrigation on your crops.

Use a Pressure Gauge – Running an irrigation system without a pressure gauge is like driving a tractor without a tachometer. Nozzles and drip emitters are designed to work at specific pressures (drip emitters are generally designed to work best at 8 – 12 psi), and you can’t judge those pressures by eye or by feel.

You want to check pressure at the beginning of your distribution lines. For drip irrigation systems and other low-pressure systems, I like the pressure gauges that are mounted on a stake, with a barbed poly connector to tie into the header line.

Monitor Soil Moisture – Nobody has spoken to me more strongly about the potential for irrigation management to maximize yields than Jim Crawford of Pennsylvania’s New Morning Farm. Jim monitors soil moisture using a standard soil probe, and the “Look and Feel” method for analysis. A soil probe like the JMC Soil Sampler with Footstep from Gempler’s lets you take a core sample twelve inches deep without too much bending; you can buy cheaper ones, but this is a nice option for making water sampling easy.

Most guides to monitoring irrigation with the “Look and Feel” method for monitoring soil moisture just duplicate information. Louisiana State University has a guide, Irrigation Scheduling Made Easy, with a better-than-average presentation of the concept and practical applications.

Keep in mind that most vegetables have fairly shallow root systems, generally from 6 – 18 inches. If you aren’t keep that area of the soil profile supplied with adequate water, you’re hampering your crop’s ability to perform.

Size Your Supply Lines – Irrigation systems, no matter how small, have supply lines, header lines and distribution lines. The supply lines get water to the field, header lines get the water to the distribution lines, and the distribution lines put the water in the field. These supply lines should be bigger (or at least not smaller) than the header lines, and the header line should be bigger (or at least not smaller) than the distribution lines.

Too many farms that I visited had supply lines that were just too small, reducing pressure and restricting the flow of water, which reduces the efficiency of water distribution. Beginning farmers especially were relying on garden hoses, the most expensive and least effective option for supply lines.

Set up Overhead Irrigation Systems Correctly – For most irrigation systems, lay out sprinkler heads such that the arc of each sprinkler just about reaches the next riser, and so that the sprinklers are offset from each other in adjacent lines. This ensures full, even coverage.
Picture
Monitor Your System – You can’t just turn your system on and walk away. When you turn the irrigation system on, you need to check to make certain everything is operating correctly. Is the drip tape leaking? Are the sprinklers all rotating?

Water at Critical Growth Stages – If you have to triage your water supply, focus the water where it will provide the most benefit. Germinating succession crops is obviously critical if you want to keep a supply of vegetables in the pipeline. Pay special attention to water supplies during tuber initiation for potatoes; fruit set and sizing and tomatoes, zucchini, and other fruiting crops; and head sizing in crops like broccoli and cauliflower.

One farm I worked with during the drought had a massive crop of tomatoes that was essentially dry-farmed all summer long. Just as harvest was getting under way, they got the first drenching rain in months – and cracked every tomato on the vine, resulting in massive crop losses.

If You’re Not in a Drought – If you’re in the vegetable business for long, you will experience a drought sooner or later. In 2012, the farms – beginning and experienced – who had invested in adequate and practical watering systems had their most profitable year ever. Irrigation is one area of the farm where, when you need the capacity, you just can’t get by without it. And there is no reasonable work-around. I’ve watched vegetable farmers haul water in 1,500-gallon tanks during a drought, and it’s a money-losing proposition. Invest now. Not only will the investment pay off in a drought year, but an easy, efficient irrigation system pays off in increased yields every year that you use it wisely.

0 Comments

Not 2,000 Miles Fresher

4/23/2015

1 Comment

 
Quality tends to fan out like waves. The Quality job he didn't think anyone was going to see is seen, and the person who sees it feels a little better because of it, and is likely to pass that feeling on to others, and in that way the Quality tends to keep on going. - Robert M. Pirsig, Zen and the Art of Motorcycle Maintenance.

When I took over management of Beech Hill Farm in Maine - this was almost twenty years ago now - we harvested product for sale six days each week. On Mondays, Wednesdays, and Fridays, we would harvest for same-day deliveries to stores and restaurants around Mount Desert Island; on Tuesdays, Thursdays, and Saturdays, we would harvest for sale in the farm's store, which was open those days starting in late morning.

Six days of harvest every week, and everything done in a just-in-time fashion! Having come most recently from a farm that harvested large quantities throughout each week and delivered almost everything to a distant market on Saturday, I was frustrated at the multiple harvests of small quantities of product - I knew that we were losing a huge amount of time to switching between crops.

Then we went to meet with our wholesale customers that fall, and I heard again and again that, "The quality is great, but the lettuce just doesn't last."

I decided to change things up. Instead of harvesting six days each week, we changed our harvest to three days each week - Mondays, Wednesdays, and Fridays, for delivery and sale in the store on Tuesdays, Thursdays, and Saturdays. We got some push-back from the stores, because this meant they had to place their orders a day earlier - and our lettuce in the past hadn't been lasting for two full days, so they didn’t feel confident of their ability to predict what they needed.

I was surprised at the results. I had expected some modest gains, but we discovered that harvesting ahead, and the thorough cooling that resulted before we delivered our product, meant that product lasted much, much longer than it had before once it reached our customers' shelves. As a result, our customers actually increased their orders because our product was no longer super-perishable - over-ordering wasn't the huge risk that it had been before.

Plus, harvesting ahead saved time as we batched lettuce harvest into three days instead of six, reduced stress as we weren't working under deadline to get deliveries out the same day, and improved our customer service because any shorts became apparent a full twenty-four hours before our scheduled delivery. In addition, we were able to do deliveries in the cool of the morning, when tourist traffic was at a low ebb.

When I started Rock Spring Farm in Northeast Iowa several years later, we took this lesson to heart, and invested in a walk-in cooler our first year in production - and it made a huge difference. Rather than selling produce three days each week, we sold at farmers market one day each week. Our get-it-cold-fast philosophy gave us a huge marketing advantage, since we were able to guarantee a full 10-day shelf-life for our salad mix. We would often give away salad mix to customers who had already purchased theirs from another vendor, with a promise that it would still be good to eat the night before the next farmers market.

The biggest complaint I hear about local produce is that it doesn't have the shelf-life that produce from California does, even once it arrives here in the Midwest. The University of California at Davis suggests that Romaine should have a 21-day shelf-life at proper storage temperatures - that's our competition in the quality department. The whole idea of 2,000 miles fresher doesn't mean a thing if we aren't able to provide the shelf life that our customers need to move product through the distribution chain. And it's just as important for retail customers in a CSA or at a farmers market, since a long shelf life allows customers to buy more produce, and have the time to figure out what to do with it - or even to figure out when in their crazy day-to-day lives they are going to have time to prepare it.

At a practical level, I recommend that nothing goes to market, or gets packed into a bag or a CSA box, unless it has had at least twelve hours in the walk-in cooler to reach its desired storage temperature.

Picture

1 Comment

Inoculate Your Transplant House

3/12/2015

0 Comments

 
Aphids suck. Literally. And they poop sugar – a bad combination that can result in stunted and deformed plants, disease transmission, and fungal growth on your plant. They are often born pregnant – female aphids can carry young that are already carrying young, just like Russian nesting dolls – which combined with a life cycle as short as seven days, can give rise to rapid and destructive population increases.

They also seem to come from nowhere. Even in an isolated greenhouse that was allowed to freeze out over the winter, aphids will suddenly show up to ruin your day. Peppers are especially prone to damage from aphids in the greenhouse, especially in the low light, high temperature conditions of early spring.

Pesticides suck, too – even organically approved pesticides are no fun at all to spray. Especially in a diversified greenhouse, trying to scout out and make targeted applications on a few dozen plants creates all kinds of problems, from how to mix up such a small batch of pesticides to how to provide appropriate intervals before worker reentry.

Fortunately, inoculating your transplant production house with beneficial insects early in the season can help suppress pest populations until light and temperature balance out. I’ve had exceptional results with releasing a variety of beneficial insects before scouting or sticky traps turned up any problems.

In fact, releasing beneficials before you see a problem lets the bugs do the scouting for you. If you’ve got a small population of aphids or other prey, a flood of beneficial insects will do a much better job of rooting them out.

Early releases also help you stay ahead of the predator-prey population cycles. Out in the world, prey populations (say, rabbits) increase ahead of the predator population (say, coyotes). As the population of rabbits increases, the population of coyotes does, too. Eventually, the population of rabbits peaks and starts to go down; then there are too many coyotes for the available rabbits, and their population starts to go down, as well.

If you’re using beneficial insects (predators) to control pests (prey), you want to introduce the beneficials when there are less pests than the beneficials can consume. Yes, some of the beneficial insects won’t have enough to eat, but that just makes them highly motivated to root out and kill the pests that are damaging your plants. An early introduction of beneficial insects really helps to keep pest populations from ever getting out of control.

At Rock Spring Farm, on the 43rd latitude in northern Iowa, I liked to flood the transplant house with a variety of beneficial insects around the third week of March. I had great success with the garden packs available from Hydro-Gardens – the “Greenhouse” pack did nice work in my 3,000 square-foot heated greenhouse, with lacewings and ladybugs to attack the aphids, as well as whitefly parasites, thrip predators, and spider mite predators - as well as beneficial nematodes to work on any early fungus gnat larvae.

(Please note: Hydro-Gardens needs to receive orders by noon Mountain time on Thursday in order to ship beneficials the following week, so it’s important to get ahead on placing your order – another reason why it doesn’t pay to wait until you see a problem starting to develop before you put the good bugs in your greenhouse.)


0 Comments

The Ruminant Podcast - Culinary Herb Production

2/4/2015

0 Comments

 
Jordan Marr at The Ruminant was kind enough to have me on his podcast recently for two episodes talking about successful culinary herb production in a farm operation.  In the first episode, I make the case for focusing on herbs, and discusses the proper sourcing, and subsequent propagation, of herb cuttings.  In the second episode, I talk about how to harvest herbs in a way that strikes a balance between high production and low labor costs.

Episode 34 - Part 1
Episode 35 - Part 2

0 Comments

Weeds Now or Weeds Later

1/22/2015

1 Comment

 
In any cropping operation, you're going to put a lot of energy into weeds - it's your choice if you want to put that energy into preventing them, controlling them, or dealing with them.

Preventing

Prevention takes two forms: an ongoing reduction of the numbers of weed seeds in the soil over a number of years, and the use of crop rotations to set following crops up for success.
If one year's seeding is seven years' weeding, then keeping weeds from going to seed is perhaps the most fundamental principle of weed prevention.

The creative and judicious use of crop rotations can also work to prevent weeds. At Pennsylvania’s Beech Grove Farm, Anne and Eric Nordell combine shallow tillage with the following crop rotation in a technique they call Weed the Soil, Not the Crop.  Complete details of their process can be found in their book.

Year 1: Late-planted cash crop
Year 2: Fallow and cover crops to winterkill
Year 3: Early-planted cash crop
Year 4: Fallow and cover crops to overwinter

At Illinois’ Angelic Organics, Farmer John Peterson emphasizes weed prevention using the following four-year rotation:

Year 1 and Year 2: Perennial cover crop
Year 3: Early-season vegetables followed by winterkilled cover crop
Year 4: Hard-to-weed vegetables

On both farms, fertility is applied to the cover crops, and work is done to prepare the soil for the following year, reducing demands on spring tillage work and labor.

Controlling

Control depends on the right operation of the right tools.

It's easy to invest in weed control tools- it just takes money. It's a lot harder to invest in the will and the systems to use those tools effectively. Invest in basic, versatile tools for weed control - sweeps and knives for the tractor, stirrups for the wheel hoe - then work to get the weed control systems working right before you invest in fancier tools.

Weed control tools must be applied early, often, and well.

Early: The right time to kill weeds is before you can even see them. It takes serious monitoring and awareness to target weeds before they break through the surface, but hoeing or cultivating weeds in the white thread stage hits them at the weakest link in their lifecycle. Every day after they break through the soil surface makes them a little bit stronger.

Often: There is not a magical number of cultivations that constitutes sufficient weed control. You're done controlling weeds when you're done controlling weeds, not after three wheel-hoeings or two hillings. And count on hand-weeding - even with great weed control, a few hardy specimens are likely to slip through.

Well: Time spent adjusting cultivators is an investment, not an expense. Time spent setting things up right ensures that you maximize returns on time you spend driving through the fields. If you farm anywhere other than the desert, you never know when you'll get another chance to kill weeds, so kill every single one you possibly can each time you hit the field with a cultivator, flamer, or hoe.

Dealing

Dealing with weeds is just depressing.

Weeds compete with plants for sunshine, water, and nutrients, reducing your yields. They reduce the airflow around the plants, increasing drying time and allowing fungi to propagate and bacteria to multiply.

Plus, harvesting in weeds takes more time than harvesting in clean fields - and can keep mechanized harvesters from working at all. More time harvesting means more expense, lost opportunities, and lower quality as it takes longer to move crops to the cooler.

I've picked my share of beans in pollinating ragweed, and pulled my share of weeds out of salad greens. And I must say, preventing and controlling weeds is easier on the spirit, not to mention easier on the bottom line.

1 Comment

Surfing the Harvest Wave

1/1/2015

2 Comments

 
Picture
When I first started growing perennial herbs for commercial sales, we would harvest only the plants that seemed ready, and only harvest what we needed from each plant. When I started paying attention, I realized that we actually did this in varying degrees in a lot of our cut-and-come-again vegetable crops, such as our kale, chard, parsley, and salad greens.

This seemed like the best way to maximize our yields, but in the end, it really just maximized our work as we spent as much time walking and evaluating each plant as we did harvesting. It also resulted in a field that had a patchwork quilt of regrowth size and quality. A chard plant with eight nice leaves would sit right next to one that had been harvested down to its nubs, or a thyme plant would be half-harvested while the other half was going to flower. And pretty soon, some plants were overgrown and woody, while the remaining plants were over-harvested to meet demand.

At the time, we were rotationally grazing sheep, and I had been reading about proper management of pastures in rotational grazing - basically, you keep the sheep (or whatever other ruminants you're grazing) on a given piece of pasture until it has all been eaten down to the best level for managing the target species in that paddock, then move the herd to new section of pasture; and you manage the grazing to prevent the plants from switching from green vegetative growth to reproductive, flowering growth.

I realized that we could apply some of the same principles to growing and harvesting our herbs and vegetables:
  1. Harvest everything in a section of the bed to the same level;
  2. Create a “wedge” of growth;
  3. Manage plants for vegetative, not reproductive, growth; and
  4. Manage our “grazing” to match the variable growth rates throughout the year.

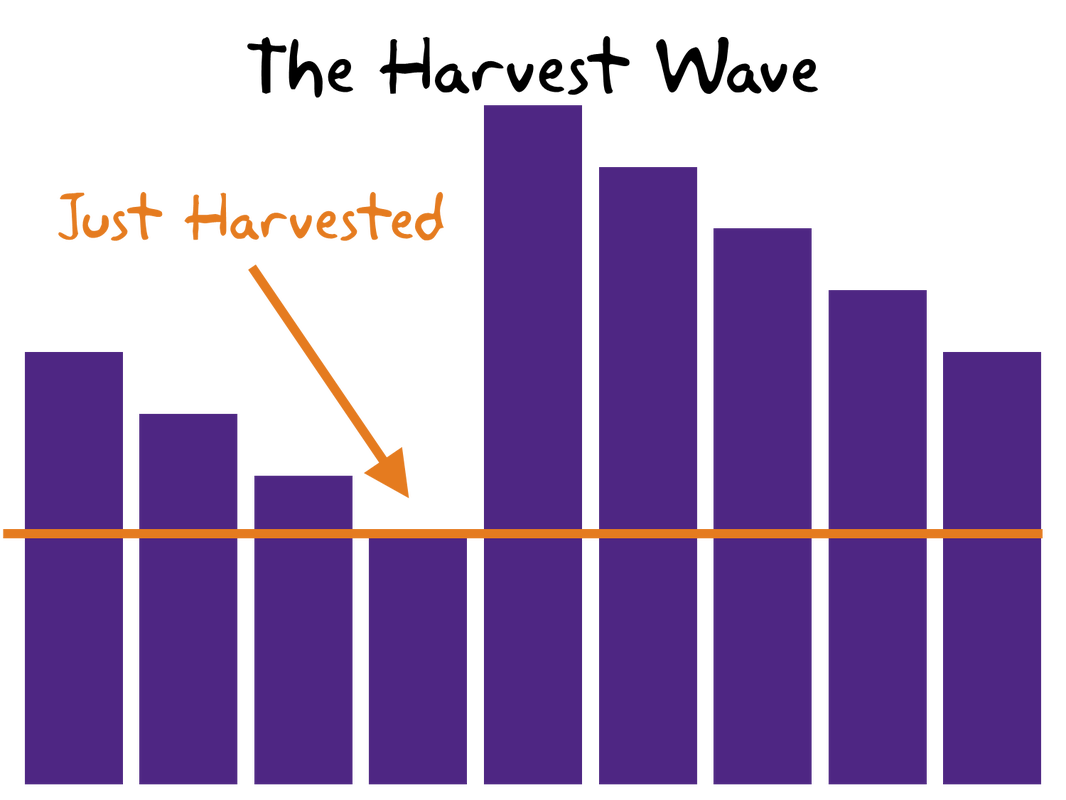
Most of our herbs and greens at Rock Spring Farm were planted as full 150-foot (and later, 300-foot) beds, with two rows per bed, so our “paddock” size was determined by how many feet of bed we harvested for a given day's needs. If the leaves on a plant were too small to harvest, we cut it right back to the same level as all of the harvested plants around it, and simply threw the too-small portions on the ground. The end result was a section of the bed in which every plant had been harvested to the same level: a crew cut on the thyme plants, or every kale plant left with 6 small leaves.

Harvest started at one end of the bed, and moved steadily down the bed with each harvest. The result was a stepped appearance, as illustrated in the picture.

Rotational grazers call the resulting growth pattern a "grazing wedge"; at Rock Spring Farm, we called it "the harvest wave" (I've always had a fascination with surfing, and waves sound much more fun than wedges). Sometimes the wave got ahead of us - the chard leaves would grow over-mature and develop spots, or the oregano would show signs of flowering - and we would cut back the over-mature portion of the bed to manage crop quality and productivity.

Surfing the harvest wave allowed us to minimize harvest labor by reducing the number of steps taken because it encouraged even regrowth and discouraged workers from hunting-and-pecking their way through the field. It also maximized yields by helping us identify when a section of the bed needed maintenance to stay green, healthy, and growing.

2 Comments

Better Not Bigger

11/13/2014

0 Comments

 
Unfortunately, most of the discussion around scaling up has to do with growing more acres, rather than doing better on the acres we’ve already got. Farming fewer acres leaves us room to grow our own fertility, and to increase our weed control through the judicious use of cover crops and careful tillage – and doing better at growing at your current scale is a prerequisite for increasing the number of acres under production.

Not to mention, increasing yields has amazing compounding effects, especially when it comes to harvest. Totes fill up faster when you have more spinach per square foot or more beans per plant. Plus, crops get back to the packing house and into the cooler more quickly – not only do you have more vegetables faster, you get a higher quality product, too.

Time and time again, I work with farmers who are failing to get top yields because they are missing two key elements of horticulture: weed control and irrigation.

Weed control pays dividends by doing more than just reducing competition. In fields with great weed control, crops like spinach and cilantro have fewer yellow cotyledons and dead leaves, resulting in faster harvests. And if you have plans to mechanize your harvest in any way, good weed control is an absolute must.

Likewise with water – fresh vegetables are made of H2O, and lots of it. The old rule of thumb of an inch of water a week is just that – a rule of thumb. Watering needs vary according to heat, humidity, and stage of growth. Optimum yields may require much more than an inch of water per week – some growers I know apply three or more inches of water during critical growth phases.

Before investing in anything else, take a moment to look into these two critical systems on your farm this fall. Too often, huge improvements can be made without resorting to huge investments – the real issue is the allocation of time and energy into these areas. Doing more with what you have will always be a surer avenue to success – financial, personal, and ecological – than scrambling to do more with more.

0 Comments

Leave Your Weeds Standing

10/23/2014

2 Comments

 
If you've got weeds that have already made and ripened seeds still standing in your fields, consider letting them stand through the winter.

A 2006 Iowa State University study suggested that making weed seeds less accessible to predators resulted in increased weed densities the following year.  Tilling your weed seeds into the soil buries them, and keeps them away from scavenging field mice and birds over the winter. Leaving them standing makes them accessible to birds throughout the winter, and shattered seeds can fall on successive layers of snow throughout the winter.

Standing weeds also slow the wind down as it blows over your field. And the wind then drops some of the snow it’s carrying.

It may not feel as pretty or as clean as a freshly tilled field going into winter, but leaving your weeds standing should reduce your weeds the next year, and provide a better moisture boost for your soil.

2 Comments

Sliding Scales

8/14/2014

0 Comments

 
Culling is hard work – especially for an employee on a small farm. Not only is said employee likely to have a cultural inclination towards saving and using everything possible – hippies and immigrants tend to share this trait – but culling on a vegetable farm is almost always inherently difficult work.

Most culling is done on a qualitative basis – “Don’t put any bad tomatoes in the box!” To get people to do what you want with culling, it pays to make it quantitive: No leaf in a Swiss chard bunch has more than three cercospora legions of more than 1/8th inch, any one legion more than ¼ inch, or more than 10 legions of any size; no tomato for wholesale has more than 2 inches of cracks, or any blackening of a crack, or any crack that is more than 1/8th-inch wide. “Throw out the squishy ones” just doesn’t do much good as a directive.

All of this gets a lot easier when most of the product makes the grade. When you have a high percentage of good widgets, identifying the ones that don’t make the grade is pretty easy. As the percentage of good widgets goes down, it gets harder and harder to judge what to throw out, and what to keep. The line between good and not-good gets a lot fuzzier as the number of culling factors goes up: “This one has a 1-inch crack, and another crack that’s awfully close to 1/8th inch, and maybe a little black in that one?”

Try to set the stage for less culling. If cercospora is endemic in your Swiss chard, plant more successions; what you spend in land will be made up for in labor. If you have problems with tomato cracking, manage your water, or consider harvesting the tomatoes slightly less ripe and finishing them off the vine. Nobody really likes to say “no,” so make it easier to say “yes.”

0 Comments

Black Belt Harvesting

5/29/2014

0 Comments

 
When I started as a white belt in Taekwondo, I felt like a bumbling klutz - forming a proper fist and putting my hips into a punch didn't come naturally, much less trying to move my left leg in a sidekick. Four years later, I don't require the kind of careful instruction for every new move that I did for those first kicks, punches, and knifehand strikes. My body understands how the different moves all fit together, and what once felt like advanced fumbling has become second nature.

The motions of vegetable farming require a different set of motor skills than texting, driving, and typing, and many employees don't arrive on the vegetable farm with a ready ability to adapt. If you are able to harvest quickly yourself - and I hope you are! - pay special attention to exactly how to do it: put your thumb here, position your wrist this way, slice towards/away from you. Then share that information with your crew, explaining that this is exactly how to do the job at hand. As your people learn the fundamentals of bunching, cutting, and trimming, they will find their own unique styles and be more able to adapt to new crops.

Some hints for moving faster, whether you are just starting out or want to refine your skills:

  • Drag containers rather than pushing them.
  • If the last motion of harvesting leaves the crop in your left hand, you should be working from left to right, so that your left hand is trailing you.
  • Keep the container near the hand that the product ends up in, and never cross your body with your hands.
  • Keep supplies like twist ties and rubber bands right at hand, next to the hand that grabs them.
  • Don't set down your tools; if you are putting a twist tie on a crop that you cut with a knife, learn to hold the knife while you put the tie on.
  • Keep tools sharp; if you can feel the knife when you cut yourself, it isn't sharp enough (but don't bleed on the produce).
  • Track progress from week to week throughout the season where employees can see it; that will provide an reinforcing feedback loop for your team.

0 Comments

Why You Need a Universal Information Capture Device

1/23/2014

0 Comments

 
Ever think of something that you need from another room, walk to the room to get it, and discover that you have no idea what you needed?

Or notice an incipient problem or opportunity and forget to do soemthing about it until it's too late?

My favorite is starting the tractor to plow the first snowfall of the season and realizing that I need to add some anti-gel to the diesel, then forgetting to do it until everything gels up. (Yes, this has happened to me. More than once.) Or seeing a tire on a field vehicle that is slightly underinflating, but failing to fill it up before it goes fully flat.

A 2011 article in Scientific American describes a series of experiments designed to explain this phenomenon. Basically, some forms of memory are optimized to keep information immediately available until it isn't needed any more. Since we can't remember everything we encounter, the brain has a mechanism for purging information that isn't needed any more. When you change locations or situations - whether it's moving from one room to another, answering a phone call, or stopping to chat with the mailman while you're plowing the driveway - your brain dumps the information it had been keeping immediately acccessible, making room for new, now-relevant information.

It may not be the best for remembering what you need when you go to the hardware store, but it certainly helped avoid saber-tooth tigers back on the savannah.

So we can't rely on our brains to keep track of information that we can't act on immediately. We need a little bit of technology. A universal information capture device is in order - and the best version doesn't run on iOS or Android. A pocket notebook and a pen - I prefer a sheaf of index cards held together with a binder clip, and a Fisher Space Pen - is the most basic, reliable way to quickly record a piece of information.

In my experience, a one- or two-word note is enough to jog the memory. The words "truck tire" is enough to make the rest of the information flood back in - or at least enough context to remind me that the tire's going flat, and I need to fill it and decide if it needs to be replaced.

Combined with a system for regularly reviewing the capture information - checking the notecards daily for things that need to be done - simple notes keep your brain from losing the information entirely, ensuring that you notice and act on things when they show up, instead of when they blow up.

0 Comments

Row Spacing and Bed Widths

3/9/2013

4 Comments

 
In my experience and observations, most vegetable growers base their row spacing on two factors:
  • Center-to-center wheel spacing on their tractors; and
  • Whether they are using a raised bed or flat bed system.


At Rock Spring Farm, we have a 60 inches center-to-center wheel spacing on all of our tractors. The Allis Chalmers G can be set to this width. This also means that most of our equipment also fits on, or is modular to, this spacing: our rototiller is 60 inches (which is a little too narrow), our tine weeder is 60 inches, and our drill is ten feet.

We've used a number of different row spacings in our thirteen years. We started off with the Eliot Coleman-recommended 3 12-inch or 2 24-inch rows. An equipment purchase the next year led us to work on 4 10-inch rows, which left the outer rows 30 inches apart. With this setup, we experienced quite a bit of disease pressure, and mechanical cultivation with anything other than a basket weeder was very difficult.

In 2005, we changed over to a system of 3 15-inch rows, and we have stayed with that ever since. This spacing has definitely improved our disease control by improving air flow, and it has made mechanical weed control much easier. We use our Buddingh basket weeder to cultivate either all three rows, or with an added sweep (purchased from Buddingh) to clean the middle row when we have crops on two rows.

When we stopped using soil blocks in 2009, we purchased a 2-row mechanical transplanter to replace our water wheel planter for every-day use. The new transplanter only plants two rows, so on transplanted crops we tightened up our in-row spacing by about 30% to maximize our productivity. Anne and Eric Nordell have done some in-depth analyses about planting more densely in the row to account for the wide-row spacings they used on their farm. The wider row spacing allows us to back the crops more densely in the row because we have plenty of air circulation; and the plant roots still have plenty of soil to scavenge in. See the illustrations in this online book to see how wide vegetable root systems are: http://goo.gl/S3kMF.

If I had it all to do over again, I would use a 72-inch tire spacing, and set my rows at 18 inches. My 30-inch 2-row spacing right now is too narrow to effectively hill potatoes. Further, my experience leads me to feel that the more dirt I can move, the more potential I have for effective weed mechanical weed control, and since that's such a key factor for yield, speed of harvest, and labor expenditures, it feels like the most critical thing to build an organic vegetable farming system around. However, the wheels on many older cultivating tractors won't adjust that wide without special spacers, which are available but which come with an additional hassle-factor.

4 Comments

Workstations for the Transplant House

12/31/2012

0 Comments

 
Effective workstations can have a tremendously positive influence on productivity by minimizing extraneous movement and avoiding discomfort or injury.

The top of the work table should be at elbow height – considerably higher than a standard folding table or kitchen counter. I feel that workers move faster when standing, so we’ve set up all of our workstations for that. Anti-fatigue mats reduce wear-and-tear on knees and backs. We have workstations at two different heights, to accommodate both larger and smaller members of the crew.

Everything the worker needs should be within easy reach. Keeping tools and supplies within a 24-inch radius to the side and front speeds things up enough to make a little nagging worthwhile. We provide a coffee cup at each workstation to store the tools needed for the job at hand. Completed flats are moved to a trolley or cart that requires only a turn and a step to get to; workers without easy access to the trolley slide flats across the table for handling by somebody who can pivot to it.

For filling flats, we’ve constructed a table with walls on three sides. We buy our potting mix in two-yard slings, so we shovel mix from the sling up onto the table, which has the additional benefit of breaking up compacted chunks. Workers mound the mix over the flat with their hands, then shake the flat hard once before using a flat board to sweep the soil from the middle of the flat to the ends.

0 Comments

Local Food Lies, Part I

2/2/2012

0 Comments

 
I’m tired of hearing about how local food is fresher than produce trucked in from California, Arizona, and Mexico. “Freshness” relates to the amount of biological activity that has occurred from the time of harvest to the time a vegetable is prepared in your kitchen. Local food can provide tremendous benefits to a community’s economic vitality, to the flavor and selection of produce, and to a more-secure, less-carbon-outputting food system; but freshness is not a fundamental quality of locally-grown produce.

When I started Rock Spring Farm, I went to a meeting of growers for local food producers in Decorah at which the produce manager of the local natural foods cooperative commented that the lettuce she purchased from local producers didn’t last very long, while the produce from California had a shelf-life of a week to ten days. I had experienced the same thing with local produce on a farm I managed in Maine, and it all comes down to temperature. In both of those times and places, local growers hadn’t invested in the equipment and systems necessary to maintain produce quality.

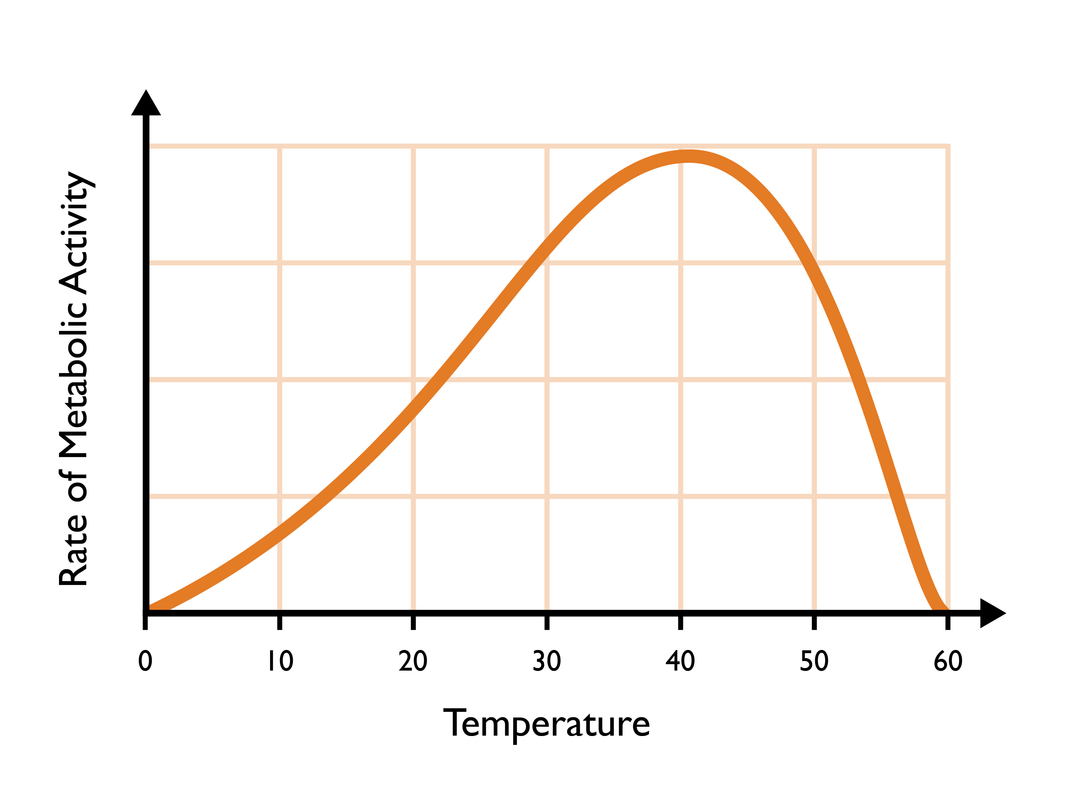
Within the range of temperatures where plants survive, the rate of chemical and biological processes approximately doubles for every ten-degree increase in temperature. That means that produce stored at 45 degrees will last half as long as produce stored at 35 degrees; and produce stored at 55 degrees will last only a quarter of the time. When we pick a vegetable, we separate it from the source of energy and sustenance that comes from having its extensive network of roots expanded throughout the soil – at this point the portion of the plant we’ve picked begins the process of dying, which in vegetables is characterized by a decline in “freshness” and quality.

Getting produce cooled to the proper storage temperature is the first essential step in ensuring freshness; keeping it at the proper temperature is the second. The large-scale production systems in the vegetable-producing regions of this country dedicate a tremendous amount of infrastructure and energy to getting produce cold and keeping it that way. It is not unusual for a harvest operation to include refrigeration units right in the field, climate-controlled packing facilities, and refrigerated transportation from harvest right to the point of sale.

Furthermore, it’s not just the air temperature of the storage environment that matters – it’s the interior temperature of the produce. Grocery store coolers and home refrigerators do not have the power they need to actually suck the heat out of warm produce – that needs to be done by the farmer. And dunking in cold water (ground water comes out of the tap at around 45 degrees on the Iowa-Minnesota state line) and storing at ambient temperatures just can’t do that.

At Rock Spring Farm, we’ve invested in the cooling facilities and harvest systems that get produce cooled quickly, and keep it cold until it’s sold. Whether it’s planning for harvest to allow time for equipment to cool the produce, our rapid harvest techniques and shading in the field prior to transport to our insulated packing facility, adequate potable water to provide a continuous supply of cold water for initial cooling, our commercial-grade walk-in cooler, or the cold chain our delivery partners maintain throughout the delivery process, we work hard to ensure that vegetables will stay alive – and stay fresh – for as long as possible.

0 Comments

Bob Quinn and Dryland Vegetables

12/11/2011

0 Comments

 
At the Sioux Falls Organic Conference last week, I had the pleasure of meeting visionary organic producer Bob Quinn, from Big Sandy, Montana. Starting in 1986, Bob transitioned his ranch from conventional alfalfa, beef, and wheat production to an organic powerhouse in northern Montana. Up in zone 3 with some 2,000 acres in production, Bob has even been experimenting with organic vegetable production without irrigation - and that's no joke in that environment.

With the vegetables, Bob has experimented with wide spacings to minimize plant demands. Last year, I read a book by Steve Solomon called Gardening When It Counts, which described Solomon's efforts to grow vegetables at low cost and in the most reliable way possible. (As near as I can see it, Steve Solomon is the real deal. He founded Territorial Seed Company, which carries all kinds of great stuff from gardening year-round out out in Oregon; he's written books on plant breeding and varietal selection for gardeners and small growers; and now he's got a modest homestead in Tasmania. Really, how cool is that?) Wide spacing was key to that. While a lot of attention has been paid in the last thirty years of market farming literature to the virtues of maximizing production on each piece of land, I think this idea of farming more land less intensively really makes a lot of sense. If you don't live in the city, why not use more land, less fertilizer, and less water, and make the work of weeding and mechanical tillage just that much easier?

As a movement of organic market farmers, I think we have tended to value high production per acre over high production per unit of effort. Yes, productivity-per-acre helps us put less acreage under plow, utilizing our land resource better and reducing up-front capital costs for land - but it requires more labor per unit of production than less-intensive production. Wider spacing can allow for better utilization of mechanical weed control, certainly - and if it reduces irrigation requirement as well, then you've saved on that labor, as well. Solomon writes that it encourages the development of more robust, more resilient root systems as well. 

Especially since good help is so hard to find, particularly once you get beyond one or two key people. For most of the expanding market farmers I have met, finding those good people becomes one of their biggest challenges. So why not do whatever you can to save on the expenses of weeding and irrigating, two jobs that nobody really seems to enjoy?


0 Comments
    Picture

    Sponsors

    img_purple pitchfork_sponsor_vermont compost

    Archives

    2016
    2015

    2014
    2013
    2012
    2011

    Announcement
    Business Philosophy
    Business Strategy
    CSA
    Entrepreneurism
    Farm Equipment
    Farm Finances
    Farming Techniques
    Farm Labor
    Farm Systems
    Farm Wisdom
    Food Safety
    Government
    Health
    Irrigation
    Management
    Marketing
    Organic Certification
    Organic Farming
    Organization
    Pricing
    Records Management
    Scaling Up
    Value

    Picture

    RSS Feed

Picture
Purple Pitchfork is a project of Renewing the Countryside, a non-profit dedicated to rural revitalization and collaborative farmer education that serves as the home for these resources Chris Blanchard created.
Copyright © 2018, Purple Pitchfork. All rights reserved.
Privacy Policy